Testing Process
Because “works on my machine” isn’t going to cut it.
Introduction
Our Testing Process is broken down into three parts:
- Developer Testing
- Integration Testing
- Pre-flight Checklists
Developer Testing
Each work item that a develop completes must be set to a status of “In Test” and assigned to a tester for testing. The tester will then test the individual area of functionality that has been changed before either assiging the item to the “Done” status or sending it back to “To Do”. See the project management process for more information on the work item workflow.
Integration Testing
Prior to a release, or periodically during the development cycle, we will write/update and execute a test plan.
A test plan uses the set of user stories that were outlined in the proposal given to the client in the sales process.
Depending on the nature of the project, we may be given web pages, or a working test version of the site or application, and this will help in the construction of the plan.
The first step to writing a test plan is to identify as many possible options or routes though the system as possible. It is often helpful to list these options in a truth table.
For example, A User may sign in;
a) using Facebook,
b) Twitter, or
c) using their email and password.
Users might be;
a) ‘normal users’,
b) ‘managers’ or
c) ‘admins’.
Once the truth table of options is built, we should create a list of scenarios that should be tested for each user story. It is never possible to test every possible permutation so some judgement is required.
For example; We might reasonably assume that testing signin;
a) as a ‘manager’ using Facebook, b) as a normal user using Twitter and c) as an admin using email and password, is a reasonable set of test scenarios.
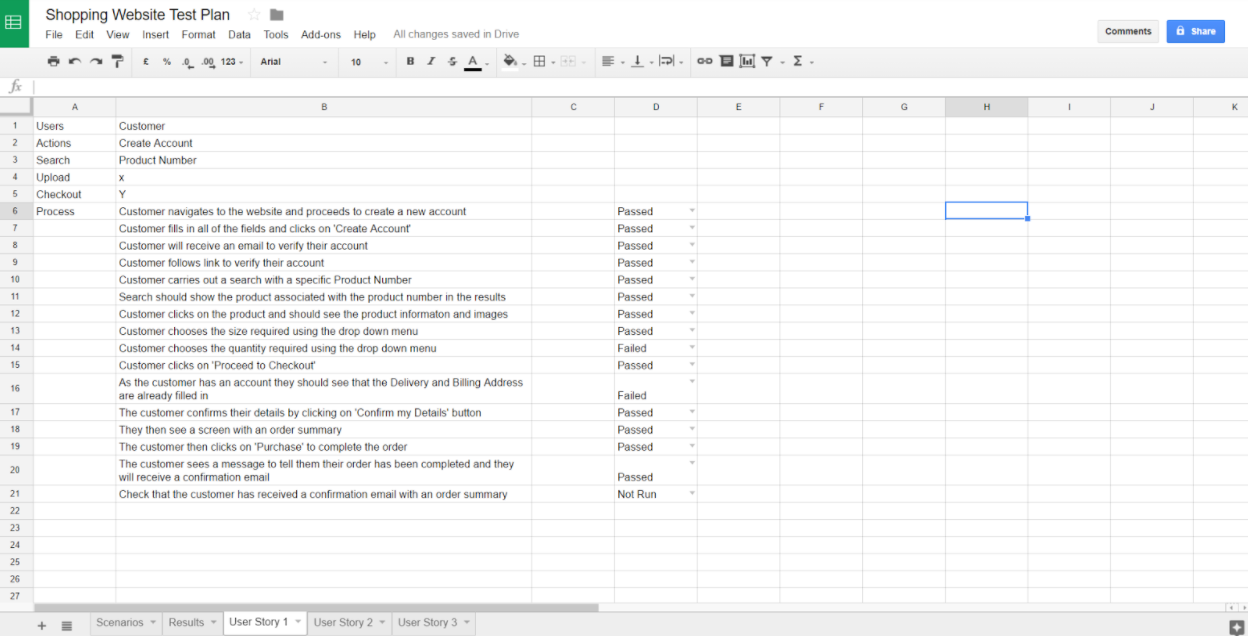
The final test plan can then be written. It should consist of one user story per sheet. Each story then has a list of several easy and straightforward steps, with each step being assigned a ‘test status’ of either: “Passed”, “Failed” or “Not Run” as testing commences.
Those steps will cover the scenarios that were identified for testing. Havings lots of small steps, rather than a few broad tasks, ensures thorough testing and also a much better understanding of the software.
Below is an example of a user story in the test plan:
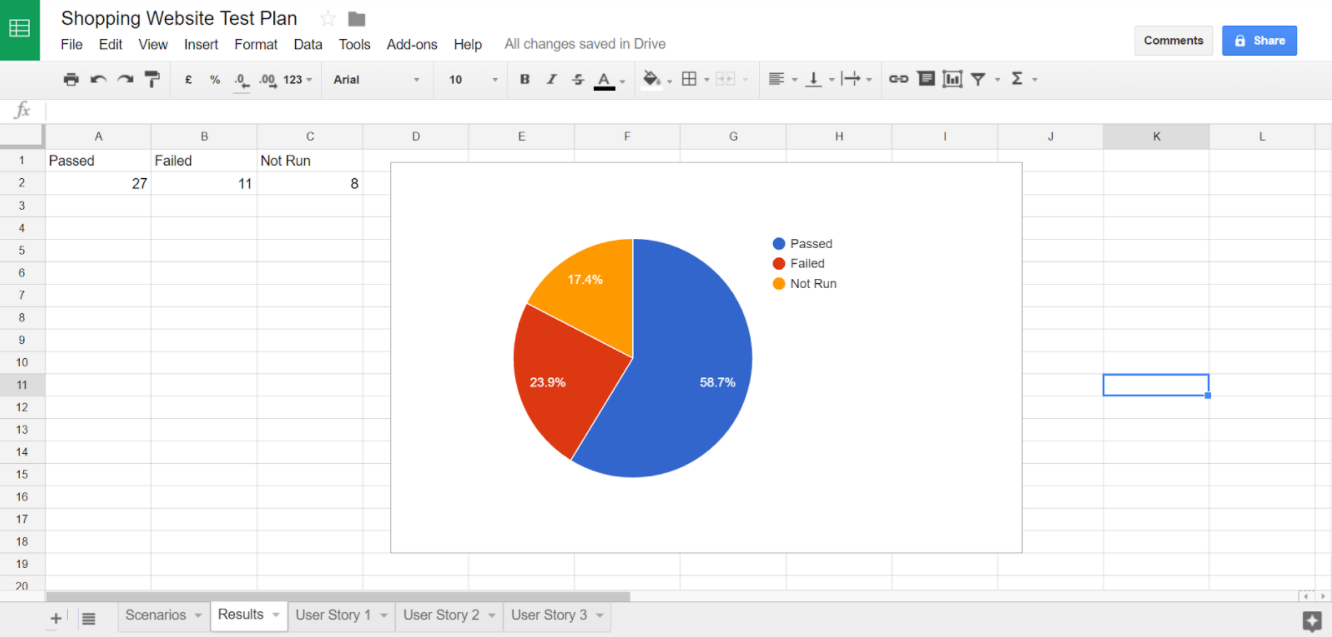
As each step has its own test status, it is therefore useful to have a Results sheet outlining the number of steps that have each passed, failed or have not been run (the test status will be “Not Run” only if that part of the software is not yet functional or the code for it has not been written).
You can then have a chart (a pie chart is nice) to illustrate clearly the fraction of steps set to each status and the progress through the project’s testing phase.
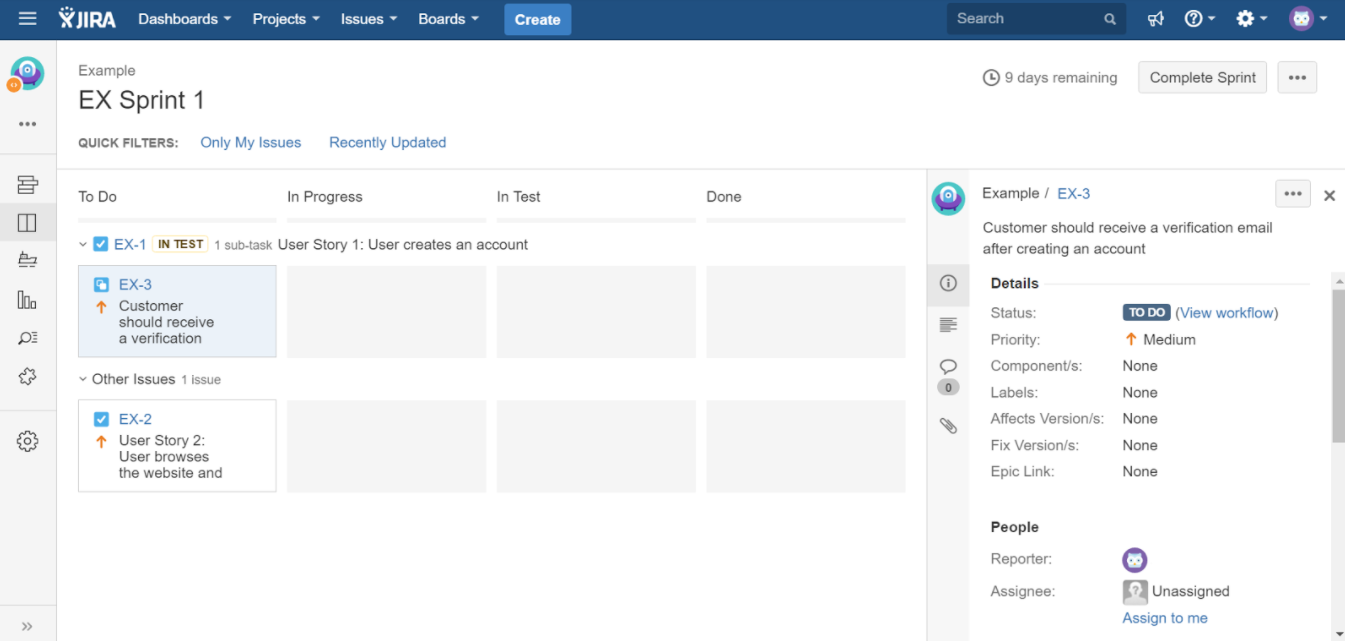
In addition to having a test plan, all of the user stories have tickets created for them in Jira.
These are both used in conjunction with one another with Jira taking the lead as it contains both tickets for the user stories, and it will be where any bugs or other tasks are recorded.
Once testing begins, any Jira tickets relating to user stories should be tested by following the steps on the relevant sheet in the test plan. If they cannot be passed, the original ‘user story’ Jira ticket remains ‘In Test’ and a new sub-task Jira ticket is created to track the bug.
It is important to record the steps that lead to the bug. This also goes for any other bugs that are found. Without detailed steps to reproduce, it is difficult for the developer to fix the issue.
As you reach the end of a sprint, it is worthwhile going back to the test plan and running through it again, end to end.
This gives you the chance to double check that everything is working as it should and to raise any bugs that may have been missed previously.
Pre-flight Checks
Developer and Integration Testing will occur on a dedicated test environmnet and will adequately test the project’s code for issues, however, sometimes things go wrong due to configuration issues or problems on the local server environment. To address this, a short “Pre-flight Checklist” will be prepared for each project, and then checked each time the project is released to a new environment.
The Pre-flight Checklist should ensure that each configuration setting or system dependancy is working correctly. It should also be quick and easy to execute and ideally leave minimal test data on the system, as this needs to be run on production systems.
In order to write a pre-flight checklist, the tester should examine the configuration files for a correctly installed system and ask them selves “If this setting were incorrectly configured, what would happen?”. The tester should also consider what would happen if system dependencies such as the database or web server were not installed and running correctly. The list of things that would break can then be re-formatted into a list of things to check.